Workflow & Status Tracking
Overview
Workflow profiles let you define the statuses a job moves through in your shop. Unlike a simple linear process, Repair Bay Evolution uses a parallel task model — multiple statuses can be active on a job at the same time. A car can be in "Body Work" and "Parts Order" simultaneously, and each status tracks its own progress independently.
You create workflow profiles in Company Settings, then assign them to jobs. Each profile can have statuses for three audiences: Shop (what your team sees), Customer (what the vehicle owner sees), and Insurance (what the adjuster sees).

Creating Workflow Profiles
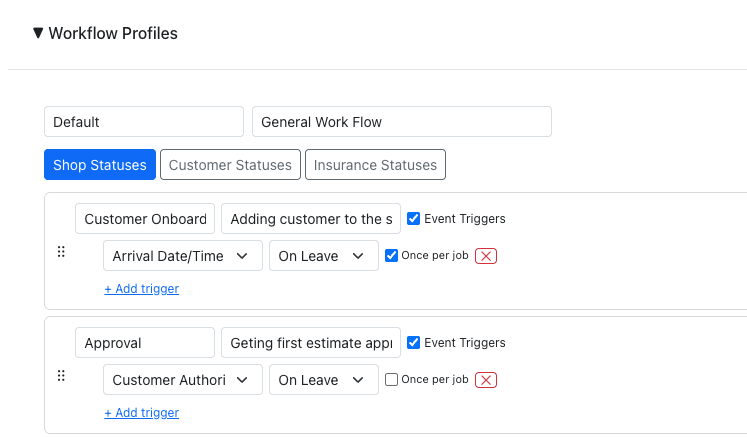
Navigate to Settings → Company → Workflow Profiles and click + New Profile.
- Enter a name and optional description for the profile
- Add statuses under each audience tab (Shop, Customer, Insurance)
- Click Save Profile
You can create multiple profiles for different types of jobs — for example, one for collision repair and another for paint-only work.

Shop Statuses
Shop statuses are the core of your workflow — these are the statuses your team will actively toggle on each job. Examples:
- Customer Intake
- Estimate Approval
- Parts Order
- Body Work
- Refinish
- Reassembly
- Quality Check
- Ready for Pickup
Each status has a name and optional description. Drag the handle (⠿) to reorder statuses — the order controls how they display on jobs, in the portal, and in reports.
WIP Flag
Each shop status has a WIP (Work In Progress) checkbox. Mark statuses as WIP if they represent actual production work on the vehicle (e.g., Body Work, Refinish, Reassembly). Non-WIP statuses are things like scheduling, customer communication, or quality checks.
The WIP flag is used in workflow reports to let you filter to just production steps — for example, the Cycle Time report can show only WIP statuses to focus on shop floor throughput.
Customer & Insurance Statuses
Customer and insurance statuses are what portal users see. They're typically simpler than shop statuses — you don't need to expose every internal step.
Examples for customers:
- Received
- In Progress
- Ready for Pickup
Examples for insurance:
- Intake
- Estimate Pending
- Approved
- In Repair
- Completed
These statuses are read-only in the portal — their state is derived automatically from the shop statuses they're mapped to.
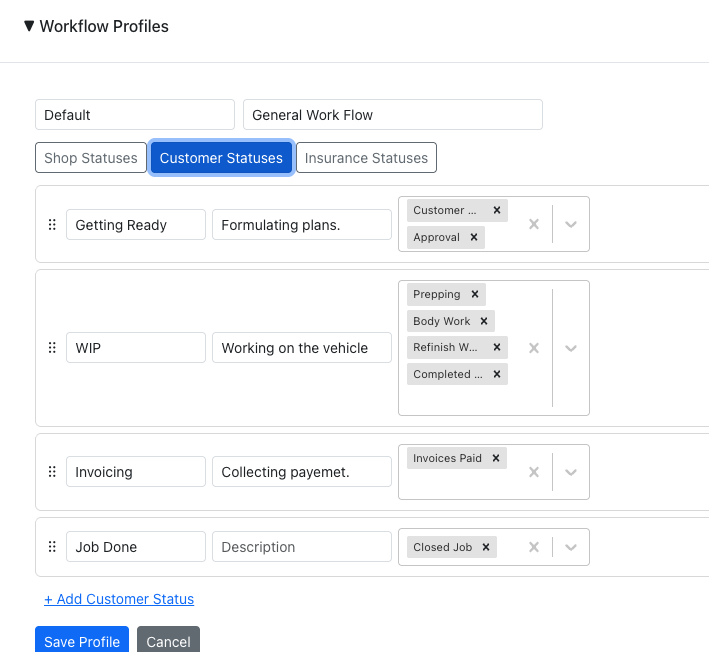
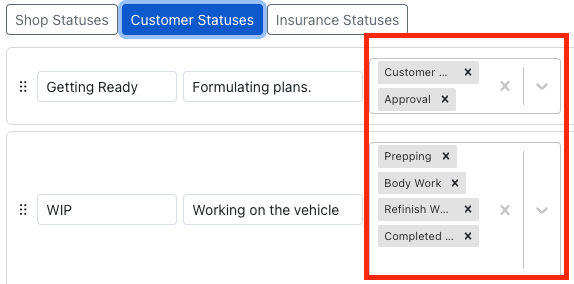
Status Mapping
Each customer or insurance status can be mapped to one or more shop statuses. This is how the portal knows what to show.
For example, if the customer status "In Progress" is mapped to shop statuses "Body Work", "Refinish", and "Reassembly":
- If all three are Not Started → customer sees Not Started
- If any of them are In Progress or Completed (but not all completed) → customer sees In Progress
- If all three are Completed → customer sees Completed
A shop status can only be mapped to one customer status and one insurance status (not shared across multiple statuses within the same audience). Already-mapped statuses appear greyed out in the dropdown.
If no customer or insurance statuses are configured, the portal falls back to showing the shop statuses directly.
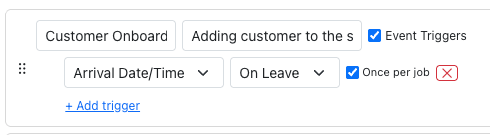
Event Triggers
Shop statuses can automatically create repair event dates when their state changes. This is useful for tracking key milestones like "Actual Start Date" or "Date Completed".
To add a trigger:
- Check the Event Triggers checkbox on a shop status
- Select the event type from the dropdown (these are the same event types used in the Events section)
- Choose when the trigger fires:
- On In Progress — fires when the status is moved to In Progress
- On Completed — fires when the status is marked as Completed
- Optionally check Once per job to prevent duplicate events if the status is toggled multiple times
You can add multiple triggers to a single status. Event triggers are only available on shop statuses since those are the ones being actively toggled.
Example: Add an "On In Progress" trigger with the "Actual Start" event type on your first production status. When a tech starts working and moves that status to In Progress, the actual start date is automatically recorded on the job.
Default Profile
You can set one profile as the default. When a new job is created, all shop statuses from the default profile are automatically added to the job.
Click Set Default on any profile in the list. The default profile is highlighted with a blue border and a ★ badge. Click Unset Default to remove the default — new jobs will then start with no workflow assigned.
Only one profile can be the default at a time.

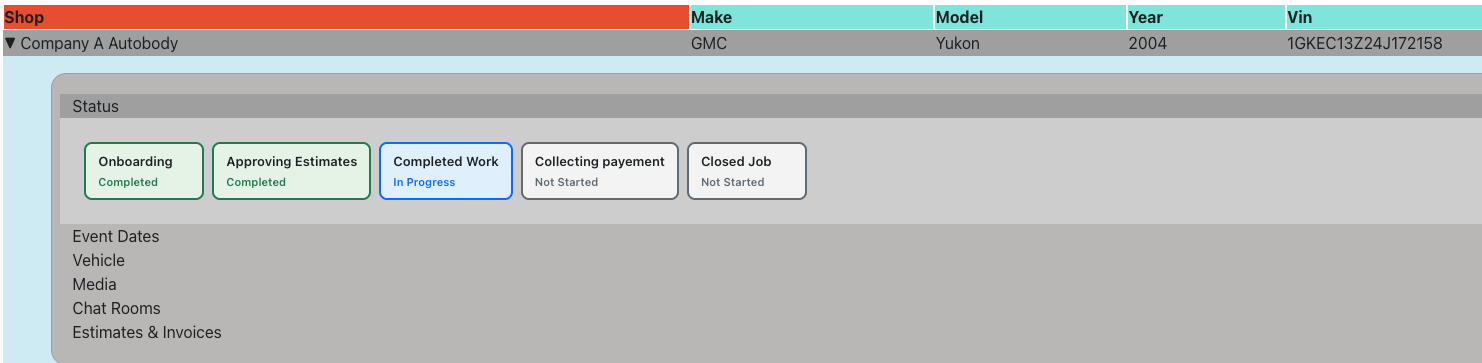
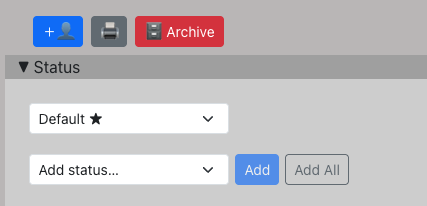
Using Statuses on Jobs
Open a job and expand the Status section. If a default profile was set, you'll see the statuses already added. Otherwise, select a profile from the dropdown.
Each status appears as a colored card:
- Grey — Not Started
- Blue — In Progress
- Green — Completed
Click the state button on a card to cycle through states: Not Started → In Progress → Completed → Not Started.
You can also add individual statuses from the dropdown, or remove a status with the ✕ button.
Bulk Actions
Two bulk actions are available to speed up workflow management:
- Add All — adds all remaining statuses from the profile to the job at once
- Complete All — marks all incomplete statuses as Completed (with a confirmation prompt)
Both actions respect event triggers — if a status has triggers configured, they'll fire as expected.
Filtering Jobs by Status
The jobs table includes two workflow columns (enable them via the column settings if not visible):
- Statuses — shows colored chips for each active status on the job. Use the text filter to search by status name.
- State — shows the overall job state (Not Started, In Progress, Completed). Use the dropdown filter to show only jobs in a specific state.
The overall state is derived from all statuses on the job: if any are in progress, the job shows "In Progress". If all are completed, it shows "Completed".

Customer & Insurance Portal View
Portal users see a read-only version of the workflow statuses under the Status section when they expand a job.
If you've configured customer or insurance statuses with mappings, the portal shows those mapped statuses with their derived state. If no audience-specific statuses are configured, the portal falls back to showing the shop statuses directly.
Statuses without any shop status mappings are hidden from the portal to avoid showing stuck "Not Started" statuses that will never change.